

Be taught the fundamentals of methods to assemble and beautify a layer cake with this detailed publish as your information. I observe the identical steps whether or not I’m making a 2-layer, 3-layer, or 4-layer cake, and whether or not it’s a 6-inch cake or a 9-inch cake. Watch the video tutorial to see me display each step.

Pictured right here is my 3-layer 9-inch vanilla cake with vanilla buttercream.
I do know making layer desserts can appear intimidating, so at present I’m serving to to make the method a bit of simpler for you. Bookmark this methods to assemble a layer cake information for any time you’re serving a layer cake, whether or not it’s a 3-layer carrot cake, 2-layer chocolate cake, or smaller 6-inch cake.
Let’s dive proper in.
Methods to Assemble a Layer Cake Video

Useful Instruments for Assembling Layer Truffles
See this publish on 10 important cake baking and adorning instruments for extra.

Step 1: Degree the Cake Layers
It’s essential your cake layers are stage, so your layer cake has stability. Be sure that the desserts are utterly cool earlier than you stage them. You should utilize a instrument referred to as a cake leveler, however I often simply use a serrated knife. Slice off the domed prime so the highest is flat. You may discard the bit you sliced off, or crumble it up and use it as garnish on prime or across the cake. (Or benefit from the cake crumbles over ice cream—my favourite!)

Step 2: Stacking
Determine on the frosting you wish to use in your cake. Most of my layer cake recipes embody the frosting recipe you’ll want for the cake. American buttercream or Swiss meringue buttercream are my 2 prime decisions for layer desserts. If utilizing cream cheese frosting, I discover it useful to refrigerate it for no less than 1 hour earlier than utilizing, because it isn’t as sturdy and secure as buttercream.
A cake turntable makes it simpler to frost the edges. I often use about 3/4 to 1 cup of frosting between every cake layer. To unfold it, use an offset spatula, straight icing spatula, or a daily knife. Unfold the frosting all the best way to the perimeters.
Place the second cake layer the other way up. This creates a flat base for the highest layer to sit down on. (In case your cake is simply 2 layers, you possibly can place the 2nd (prime) layer the other way up OR proper aspect up.) Verify to verify the cake layer is stage all the best way round. Then add one other 3/4–1 cup of frosting on prime, once more spreading it to the perimeters.

Place the highest layer on prime. You may place it the other way up once more if you would like your cake to have a really straight look on the edges and a superbly flat prime, however I often place the highest layer right-side-up, in order that there’s a little bit of a curve to the perimeters.

Step 3: Crumb Coat
This can be a very skinny layer of frosting utilized to the highest and sides of the cake, which helps lock in any free crumbs and provides stability to the completed layer cake. It additionally makes a pleasant clean base for frosting and adorning. Use about one other cup of frosting (240g) for that. Begin transferring the frosting from the highest down the edges. Go across the sides with a bench scraper—it’s a very helpful instrument that makes straightforward work of smoothing out the edges. Refrigerate for 20 minutes to an hour to set the crumb coat.

Step 4: Ending & Adorning
As soon as your crumb coat has set, you possibly can end the cake with a thicker layer of frosting. I like to recommend a straight spatula for this. You should utilize your bench scraper once more for clean sides, however I like a bit of texture.

Should you used a cake turntable and wish to switch your cake to a serving platter or cake stand, it’s useful to have a cake lifter instrument and a second set of fingers.
When you have additional frosting, you need to use a piping bag and tip and add some ornament. Right here I used the Wilton 1M tip to pipe a shell border across the prime and backside of the cake.

Relating to cake adorning, I prefer to maintain issues easy. As a lot as I like all these cake artists on the market and marvel at their creations, I settle for that cake artistry is solely not in my talent set! BUT there are methods you can also make an attractive layer cake, even for those who lack creative talent.
Take this rustic-chic bare cake, for instance. Garnishing with recent florals and berries provides easy, refined magnificence—no piping ideas, fondant, or modeling chocolate required.
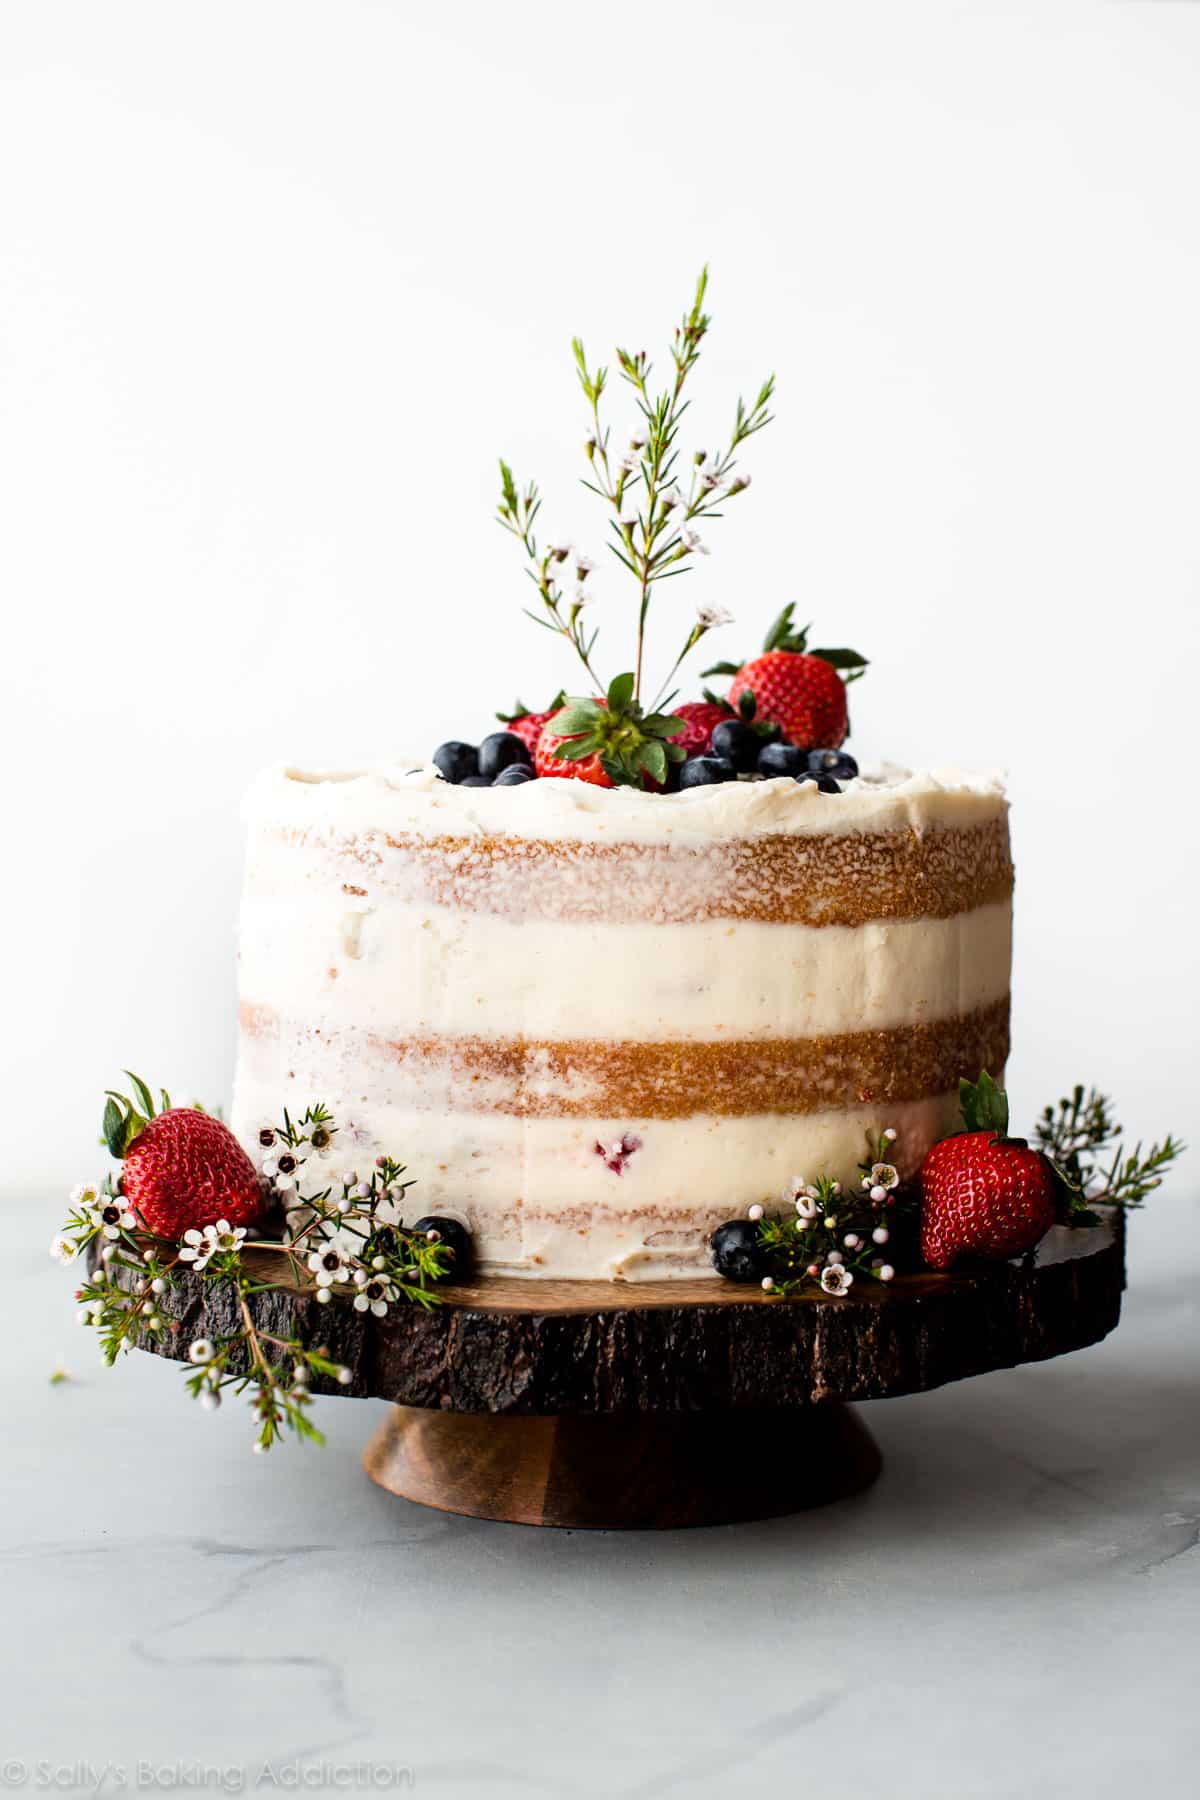
A easy garnish of recent berries and mint is certainly one of my favourite methods to garnish a cake, as a result of it’s so EASY, but takes the cake to the subsequent stage.
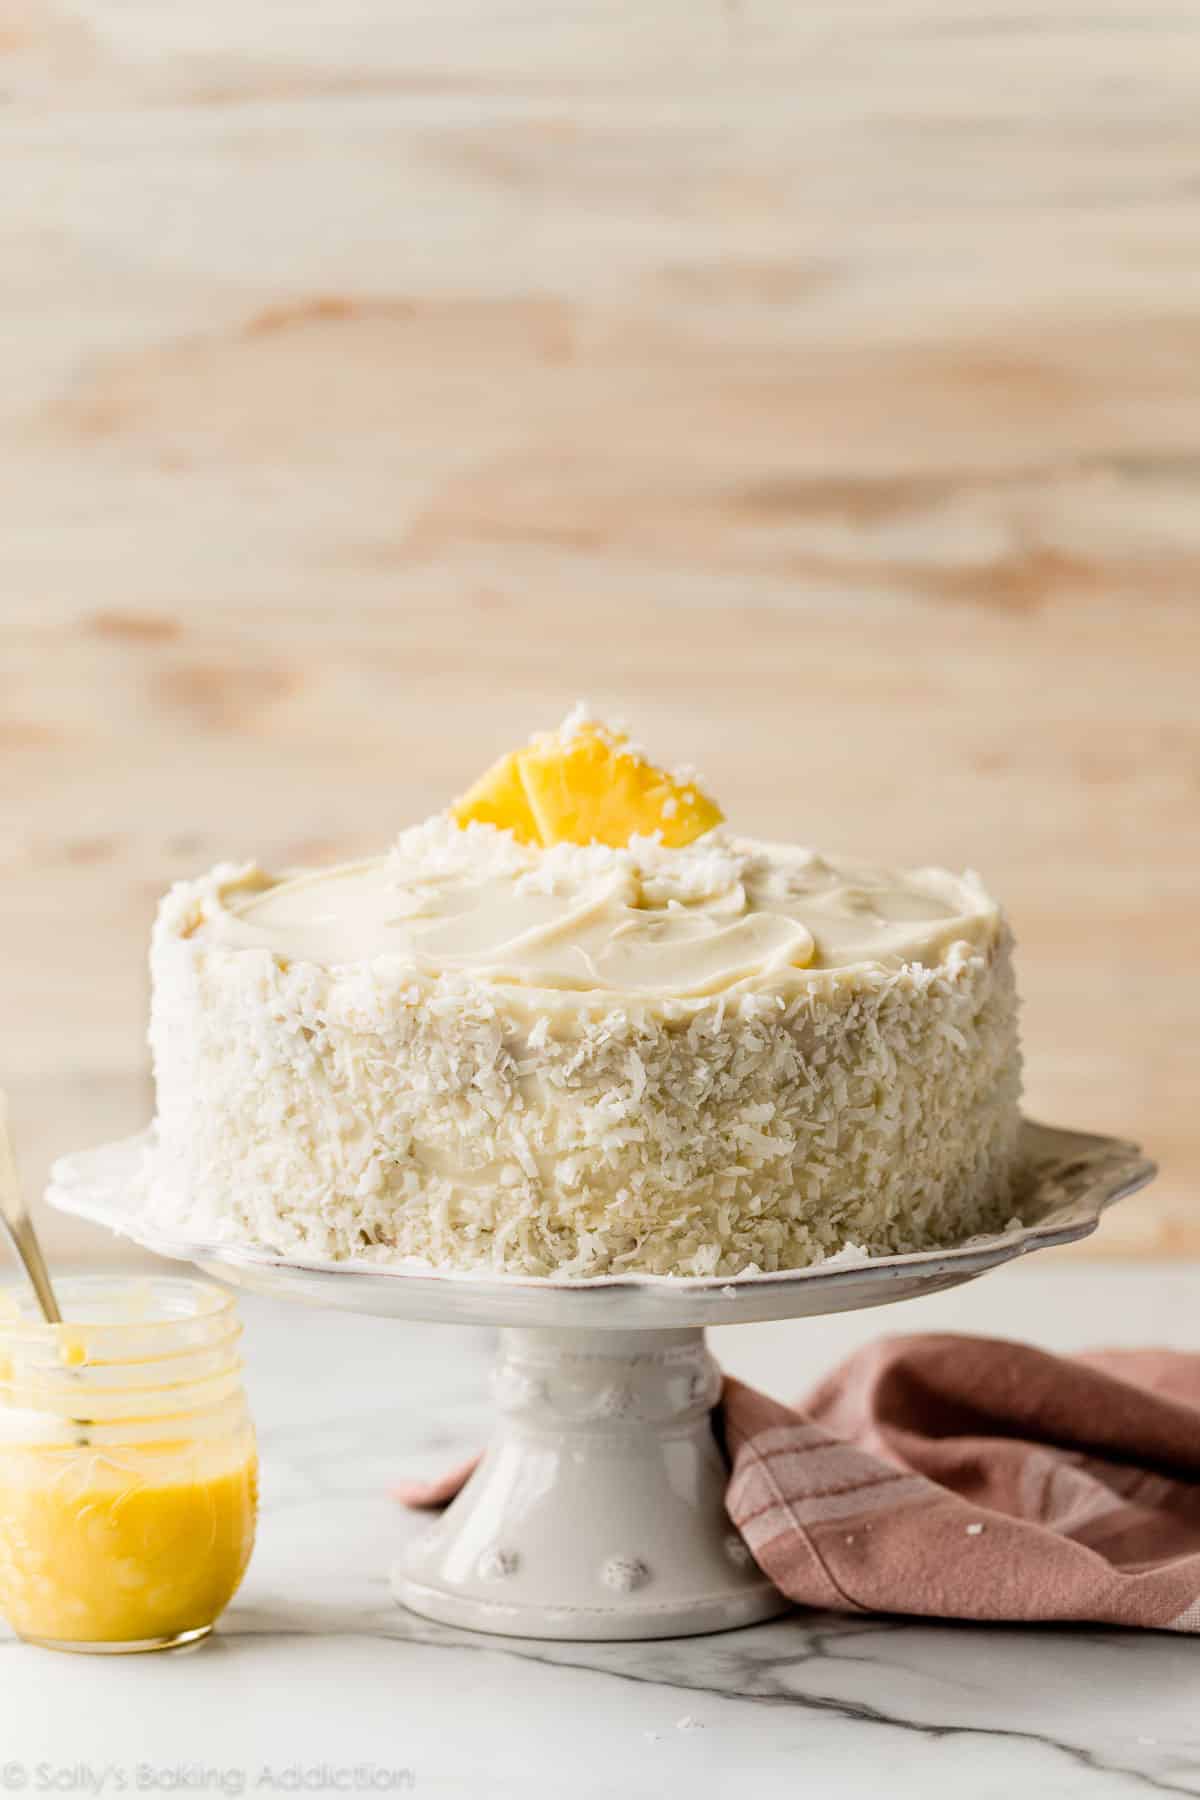
It’s also possible to garnish with an ingredient used within the cake, equivalent to toasted nuts on prime of this carrot cake, or coconut and recent pineapple on prime of this pineapple coconut cake.
Extra Cake Baking & Adorning Tutorials
PrintDescription
Be taught the fundamentals of methods to assemble and beautify a layer cake with this detailed information. I observe the identical steps whether or not I’m making a 2-layer, 3-layer, or 4-layer cake, and whether or not it’s a 6-inch cake or a 9-inch cake. Watch the video tutorial to see me display each step.
- Degree the Cake Layers: It’s essential your cake layers are stage, so your layer cake has stability. Be sure that the desserts are utterly cool earlier than you stage them. You should utilize a instrument referred to as a cake leveler or use a serrated knife. Slice off the domed prime of your desserts so the highest is flat. You may discard the bit you sliced off, or crumble it up and use it as garnish on prime or across the cake. (Or benefit from the cake crumbles over ice cream—my favourite!)
- Stack the Layers: Place the underside layer proper aspect up on a cake turntable or cake stand. Place 3/4 to 1 cup of frosting (anyplace between 180–240g) on prime. Utilizing an offset spatula, straight spatula, or a daily knife, unfold the frosting all the best way to the perimeters of the cake. Place the second cake layer the other way up evenly on prime, which creates a flat base for the highest layer to sit down on. (*See finish of this step if you’re making a 2-layer cake.) Verify to verify it’s stage all the best way round. Then add one other 3/4–1 cup of frosting (180–240g) on prime, once more spreading it to the perimeters. Place the highest layer on prime. You may place it the other way up once more if you would like your cake to have a really straight look on the edges and a superbly flat prime, or you possibly can place it proper aspect as much as have a little bit of a rounded edge. *In case your cake is simply 2 layers, the 2nd/prime layer could be the other way up or proper aspect up, relying if you would like a straight edge or rounded edge on prime of your cake.
- Add the Crumb Coat: A crumb coat is an especially skinny layer of frosting utilized to the highest and sides of the cake, which helps lock in any free crumbs and provides stability to the completed layer cake. For a 3-layer cake, use about 1 cup of frosting (240g) for it. For a 2-layer cake, round 3/4 cup (180g). Unfold it everywhere in the prime and sides. To clean out the edges, run a bench scraper across the cake. Refrigerate uncovered for 20 minutes to 1 hour to set the crumb coat.
- End Adorning the Cake: As soon as your crumb coat has set, end the cake with a thicker layer of frosting utilizing a straight icing spatula. You should utilize your bench scraper once more for clean sides, or maintain the edges textured as proven within the video. Should you used a cake turntable and wish to switch your cake to a serving platter or cake stand, it’s useful to have a cake lifter instrument and a second set of fingers to elevate and switch it. When you have some additional frosting, you possibly can fill a piping bag and add some ornament. Right here I used the Wilton 1M tip to pipe a shell border across the prime and backside of the cake.
- When you’ve gotten completed adorning your cake, it’s greatest to refrigerate it uncovered for no less than 20 minutes earlier than slicing and serving. Relying on the cake, you possibly can refrigerate it for as much as 4 to six hours. To retailer leftover cake or for those who plan to move the cake, I like to recommend a cake service as a result of it retains the cake recent with out touching or smearing the frosting.
Notes
- Particular Instruments (affiliate hyperlinks): Serrated Knife or Cake Leveler Software | Cake Turntable | Silicone Spatula | Small Offset Spatula | Massive Straight Spatula | Bench Scraper | Cake Lifter | Cake Stand (like this one or this one) | Piping Bag (Reusable or Disposable) | Wilton 1M Piping Tip | Cake Provider
- Quantity of Frosting: Basically, for an 8-inch or 9-inch spherical cake, you’ll use 3/4–1 cup (180–240g) of frosting between every cake layer, plus one other 3/4–1 cup for the crumb coat. After that, the quantity of frosting relies on how thick you need the outside layer and for those who’ll wish to add piping particulars to the cake. I often use 4.5 cups (1080g) on a 2-layer 8- or 9-inch cake, and 5–6 cups (1200–1440g) on a 3-layer 8- or 9-inch cake. For a 3-layer 6-inch cake, use about 1/2 cup (120g) of frosting between every layer, 1/2 cup for the crumb coat (give or take), and 1–1.5 cups across the prime and sides to complete (3.5–4 cups (840–960g complete).
[ad_2]